Voice-Over Voice Actor

A Peek Into The Secret World Of The Voice Actor

Interested in pursuing a career in VO? Curious what goes on behind the scenes in a business where people talk funny for money? This book offers a fun and comprehensive look at what it takes, what goes on and what it’s like behind the mic from two working pros who started from scratch.

Filtering by Tag: exercise,mic technique

Reminder: Work on your mic technique!

We are regularly asked about how to use a mic correctly, so here are our guidelines, again. Keep working on it, and soon it will be comfortable and second nature.


man an d mike cartooon

Tips for Microphone Technique

The mic can be rather daunting when you first start out in voice-over! Practicing at home with one will help to reduce the newness of it, and the distraction from it.

Here are some tips to get you started.


PROXIMITY

Find your own comfort zone, with regard to proximity. Many voice-over artists will angle slight to the right or left of the mic, for two reasons:

1) This can reduce or eliminate pops from plosive sounds like t, b, or p. When you're in a session, engineers can help by putting a “pop shield,” a stocking device or foam shield, in front of the mic. But if you angle- speak slightly across the mic - you create a similar effect to a pop screen.

2) You will be able to see and read your copy off to the right or left, without the mic being right in front of it.


VOLUME

Well, the mic is there to amplify the sound, so you can be as soft or loud as the job requires, but you need to work with the mic to create this. If you are recording yourself, make sure you are getting a solid wave form, and if you are working with an engineer s/he will do this by first getting a good level of your planned volume before recording the take. You can’t speak softly while the engineer gets a good level, and then shout during your take!

Every different session will call for something different in the way of volume . For example, if you want low, deep sounds from your voice it can help to get very close to the to the mic, perhaps two to three inches. If you know you are going to really project, and speak louder, stand back, seven to nine inches from the mic, so your voice doesn’t distort.

Then trust the mic and your own voice and skill. If you need drama and a “dark” interpretation, you might try a whisper, or near-whisper. And if it is comedy, use a little more level and smile the whole time you are speaking. It is amazing that a smile can come right through the microphone to the listener!


LIGHTING

You must be able to see well, to read your copy! Make sure you are well prepared with contacts or reading glasses if you need them, and some artists even carry a small clip-on light, which runs on a battery, to attach to the stand holding your copy. Lighting must be ample to reduce the possibility of unnecessary errors when you read. In many studios you can ask to increase the level of light if it isn't bright enough for you.


TECHNIQUE AND SKILL

Do your breathing exercises. Practice reading all kinds of different material at home in front of the mic. Try things and experiment at home to learn what your real strengths are. And stretch yourself to try new things. Try different pitches, different volumes, mimic cartoon characters or famous actors or comics. Read out loud in front of the mic and record it if you can, to listen back - you will learn so much from hearing your own work.

The more you develop and then employ your microphone technique and skill, the less the engineer and producer have to rely on enhancements in the studio. The less they work, the faster and easier the session, and the more likely you are to be re-hired! Plus, comfort and skill with the microphone shows your professionalism, getting the job done well and quickly, which is the producer’s goal!


Voice Over in the Studio: The Proper Distance from the Mic


Microphone technique

VO actors: The Proper Distance from the Mic


distnce mic
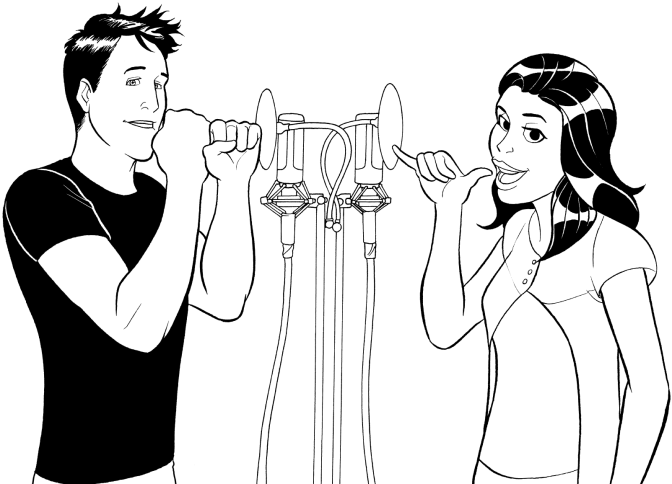
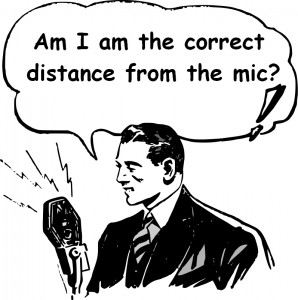
The microphone is very sensitive, so where should you stand in relation to it? The engineer might ask you to get a little closer or stand a little farther back, but here's a good place to start: open up your hand, palm up. Now, close just your three middle fingers (the index, middle finger, and ring finger). You're left with only your pinky finger and thumb extended, much like the popular surfing Hang ten sign or, if you hold your hand up to your ear, the international Call me! sign. The distance from the tip of your pinky to the tip of your thumb is about the distance your mouth should be from the mic. You can also put two fists on top of each other to measure roughly the same distance.

An exception to this mic distance rule is when you're working with a loop group doing ADR and walla. In that case, you'll be working in a larger room, moving around a lot with a group of people, and your distance from the mic will be much farther.

Now, obviously, these rules may change depending on the type of sound you're trying to create. For example, if you're going for a whispered, or soft, sultry quality, you may wish to get a little closer in on the mic. For yelling and screaming you will probably want to back off so as not to blow out the engineer and whoever else may be in the studio.

When you speak, the sound comes out in a cone shape; so while a mic will generally pick you up no matter where you are in the booth, you'll always get your best sound if you're standing directly in front of it. And once you're in position, pay attention to where you are and how that feels. It'll be important for you to maintain a pretty consistent position throughout your session so that the recording quality matches from line to line and session to session.

How much freedom do you have to move around? The answer is … some. You shouldn’t be worried about keeping your head stock-still. You have some play: about 15-20° to the right and to the left. The same goes for up and down. There’s a stand in the booth to hold your script, so feel free to tilt your face down to read from it. The mic can take it, and so can the engineer.

You definitely don’t have to memorize each line and then look up to deliver it, although some people might do this, particularly if they’re looking up to sync with mouth movements on a screen. The trick is to do the looking with just your eyes, and not change the relationship of your mouth to the mic in the middle of a take. Moving your head will make a difference to how the recording sounds. So, before you say the line, decide how you want to place your face in relation to the mic.

Movement only begins to cause problems in two cases:

1. when the movement itself gets noisy, either due to your clothing/shoes or your flailing about and knocking into things

2. when your movement carries you too far from the mic or too close to the mic

Either of these cases can cause you to have to do another take of the line because there are limits to what even the engineer can compensate for.


 +++++++++++++++++++++++++++++++++++++++++++++++++++++++++++++++++++

Check out our VoiceOverVoiceActor website for more tips and exercises. We post daily VO tips on Facebook and Twitter, and our book, Voice Over Voice Actor: What it’s like behind the mic  includes a wealth of exercises to build your voice and keep it ready for a successful voice over career!


Microphone Technique

The mic can be rather daunting when you first start out in voice-over! Practicing at home with one will help to reduce the newness of it, and the distraction from it. Here are some tips to get you started!

Read More

Take Action #25: Radio Follow-Along

Turn on the radio or TV and try to mimic not only the words, but the accent, the inflection of the speaker and see how close you can get to sounding like them. This is another great (and inexpensive) way to practice is to mimic things you hear. Listen to your favorite radio station and simply mimic the DJ’s, the commercial announcers, even the newscasters. Not only will this clue you in to the types of voices that are booking work, but you’ll often come up with new and exciting voices just by trying to mimic someone else’s.

Take Action # 24 Audition Time

1. This exercise is to help simulate an audition experience for you. Remember to look for all the information on the page to give you clues to your performance.2. Do a trial run with each of the specs and record yourself. Play it back and listen to hear if what you planned in your head was apparent in your recording.

Try out the following Commercial and Animation Audition Copy using the following specs. See how each unique spec changes your performance.

Commercial

Specs: 1. young, cheerful, spunky 2. wants to be everyone’s friend 3. eternally optimistic 4.intelligent, honest, down-to-earth

1. In the summer heat, 2 bucks can go a long way. Now, at The Burger Joint, grab a large drink, large fries and your choice of hamburger or cheeseburger for only $1.99. Come in and fill up for less than 2 bucks.

2. Why choose one of those other companies that might loose your package or handle it with less-than-optimal care? Let BoxYouUp come by your office or home and package, mail and deliver your important items at your convenience. Visit BoxYouUp.com for pricing. Animation

Specs: 1. energetic, sporty, hot shot 2. is always having a good time 3. goofy, crazy, wild 4.nervous and easily excited

1. Hey little monkey, I don’t know what you are doing in there, but you need to come out right now. You hear me?I don’t wanna have to yell. C’mon now. Get out. Get. OUT. Monkeeeeeeeeee! OUT. Now see, that wasn’t so bad, now was it. Ha! Silly monkey.

2. You mean there is more out there than this? Robots even? Wicked! Because I’ve been waiting my whole life for that.I just know I can take them on. Let’s go. What are you waiting for? Let’s do this thing. Woah. Did you see that? I’m awesome.

Fantastic. Hopefully getting the experience of listening to your performance has given you a deeper understanding of the variety of things you will want to consider when working on audition material or even going to an audition. Of course, this exercise can’t exactly duplicate an audition experience, but the more prepared you feel before you go into an audition situation, the more confident and relaxed you will be, and the higher your chances of you doing your best work, and with any luck, booking the job!

Take Action #23: Fight Sounds

1. punch small medium large 2. kick small medium large

3. attack small medium large

4. hit (you’re being hit) small medium large

5. death small medium large

The above is a good example of something you’ll encounter quite a bit in video games because video games are generally chock full of action. Imagine what kind of sounds you’d make in the given situations. Mix it up a little and try a variety of sounds like hy-ah, ki, shah, rah, gar, huh, for example. Try the same sounds with different types of efforts to see how they come out. Experiment with different lengths of efforts. Often in a video game session they will ask for a small, medium and large version of each fight sound. Imagine the difference between getting your earlobe flicked, getting punched in the face and getting decked with a sledgehammer. A good imagination will bring variety and directors really like variety. Give ‘em what they want and they’ll call you again.

Try to make sure you are generating the sound from good diaphragmatic support and not uncomfortably constricting your throat to create the sound. Straining your throat can put a lot of pressure on your vocal cords and could damage your voice.

Another great (and inexpensive) way to practice is to mimic things you hear. Listen to your favorite radio station and simply mimic the DJ’s, the commercial announcers, even the newscasters. Not only will this clue you in to the types of voices that are booking work, but you’ll often come up with new and exciting voices just by trying to mimic someone else’s.


Take Action #22: Complete Body Warm-Up

1.lie down flat on your back somewhere comfortable yet firm 2. hum/sigh in and out

3. practice panting

4. roll over to one side and then slowly get up to a standing position (make sure you’re not holding your breath!)

5. do some neck rolls - very gently roll your head around in small circles both clockwise and counterclockwise to warm up your neck and throat

6. do some shoulder rolls - gently roll your shoulders forward and backward to loosen and warm up your back and neck

7. shake out your feet/hands - gently get your circulation going by shaking your hands and feet out

8. jump 1-10

9. massage your face - rub your hands together until they’re warm, then massage your face to relax all the bones and muscles there

10. lion/mouse – this is a fun one, which you can do in front of a mirror if it makes you happy. As the lion, stretch and open all the muscles in your face, your eyes your mouth so you look like a scary lion getting ready to bite your head off, then immediately switch to mouse face, where you twist and tighten all the muscles in your face, eyes and mouth so that you are as small and pressed as possible, switch between the two to send blood to those areas and wake them up.

11. tongue extension - stick your tongue out as far as it will stretch, then pull it back in. do this several times. Also try and touch your nose with your tongue. Now your chin. Now your right ear, and now your left (if you have to towel your face off after this one, you’re doing it right).

12. sirens

13. trills

14.P-T-K-T, B-D-G-D

15. tongue twisters (find some of your favorite tongue twisters and practice saying them as quickly as possible) search “tongue twisters” on the Internet and see what comes up (“Peter Piper…” What a to do…” “Unique New York,” “Red leather, Yellow Leather…”).

Now, hopefully, you feel awake, alive and ready to play. You can take as long as you’d like with this warm-up or you can time yourself. For example, if you’re short on time, see if you can get thru the entire warm-up in only 5 minutes. If you have more time, allow your body to warm up a little more slowly, maybe giving yourself a half hour to get through all the exercises. Adjust the warm–up to your specific needs.

Fight sounds, efforts and reactions can be a tricky part of voice-over especially if your voice isn’t warmed up. They’ll turn up almost no matter what type of VO you’re doing, from animation to video games to sometimes even commercials. Take the time to make sure your voice is fully warmed-up and awake before trying this next exercise so that you don’t hurt your vocal cords.

Want to feel ready to tackle auditions, VO sessions or expand your breath control and range? The Warm-Up MP3 or CD - both are available here


Take Action #17: The Count

1-2-3 inhale 1-2-3 hold 1-2-3 exhale 1-2-3 hold 1-2-3-4 inhale 1-2-3-4 hold 1-2-3-4 exhale 1-2-3-4 hold 1-2-3-4-5 inhale 1-2-3-4-5 hold 1-2-3-4-5 exhale 1-2-3-4-5 hold

Having a strong diaphragm will not only help you maintain your breath for longer periods of time, it can also help you yell, scream, shout and make fighting and reaction noises, all of which are likely to come into play in voice acting. Continue exercising and strengthening your diaphragm so that no matter what type of VO job you jump into next, you’ll be that much more ahead of the game.

Certain sounds (“s” and “z”) will naturally help you ‘hold on’ to your voice and increase the amount of time you can breathe in or out. The next exercise will help you to strengthen this ‘muscle.’ Using the “s” or “z” sound, (rather like a snake hissing) try to slow the air down as much as you can while pushing it out. Start by counting to a lower number (say, three) while inhaling, then exhale on the hiss for three as well and up the count as you feel comfortable doing so. Try also adding a count between breathing in and out, so you’re breathing in, holding, then breathing out, holding, then breathing in again, and so on.

Take Action #15: Front-Mid-Back Sounds

1. Using a “nee, nee, nee, nee” sound, try squinting your eyes or scrunching your face muscles between the sounds and on some of the sounds to create a more nasal resonance2. Switch to humming to feel a very mid mouth placement 3. Now move the sound to the back of the mouth and throat by making a “guh, guh, guh guh” sound. 4. Try switching between the “nee”, the hum and the “guh” tofeel how your voice resonates in different areas of your body.

It can be very fun to learn to control your voice and be able to switch between a voice that is more frontal and a voice that is further back. Try reading this paragraph out loud in your natural voice and while doing so, move the sound toward your nose for a bit, and then reverse it and move it toward your throat and belly. Pay attention to where your voice is most comfortable as well as where it’s beginning to expand to offer you new and exciting options.

Take Action #14: Chewing Hum

1. Keep your mouth and lips closed and begin to hum.2. Start chewing, as if you were eating something tasty, as you keep humming. 3. Now use your hands to feel the vibration in the front of your face, your nose, your cheeks, and gently allow your hands to move to your neck and throat, and perhaps even onto your belly so that you can feel how your voice resonates in different areas of your body.

Using the chewing hum can warm up the different areas where your voice will resonate. Once again, when your voice resonates, it bounces around a certain area of your body, whether that’s up in your face, nose or head area, your throat, or your chest or belly.

Now to begin to identify where your voice is resonating, let’s concentrate on specific sounds that tend to resonate in different areas. Certain sounds we create generally vibrate more toward the head, while others, because we use different muscles to make them, may vibrate lower, toward the belly. If you can learn to control where you choose to place your voice, you can begin to use it in more powerful and interesting ways.

COME VISIT US ON FACEBOOK! Voice Over Voice Actor

Take Action #13: Sirens with and without Lip Trill

1. Keeping your lips together, like you were making imaginary car (or motorboat, if you prefer) “brrrm, brrrrm” noises, and allow your lips to make a “raspberry” type sound (like a good old-fashioned Bronx cheer without sticking your tongue out), or lip trill. Begin at the bottom of your possible range and while continuing the lip trills gradually raise your pitch until you hit your highest note possible.2. Now reverse direction. Start at the top of your range and move downward thru your natural pitch to your lowest note. 3. Continue your lip trills while going from low to high and back to low again. It’ll sound a little like a siren. 4. Repeat the sirens 3-5 times until you feel like your voice is beginning to get warmed up. 5. This can be hard to describe on paper. Feel free to visit this link ( ) to see an example.

Lip trills are a great way not only to warm up your face and resonators in your sinus cavities, but also helps keep your vocal cords and neck muscles from tensing up while you’re warming up your voice. Don’t worry if your voice cracks during the sirens. That’s just a natural part of expanding your range. We all have “head tones” (high) as well as “chest tones” (low) in our range, and in order to move back and forth continuously from one to the other, you have to move through your natural “break,” which is the sound that often people associate with a teen boy going through puberty. One of the reasons for this is that the vocal cords are actually growing and stretching and sounds that used to be easily within one range move to a different register, and the voice “cracks” as it pushes through unfamiliar territory. So in addition to warming up your voice, this exercise can also help you widen your vocal range.

Sirens w/out Lip Trill

1. Allow your mouth to hang slightly open, and begin an “ee” sound at the bottom of your range. As you exhale, slide your pitch higher and higher until you hit your highest note possible. 2. Now reverse direction. Start at the top of your range and slide your pitch downward until you hit your lowest note. 3. Make sure your face and jaw are relaxed and comfortably open while making the siren sound. 4. Repeat the sirens 3-5 times until you feel like your voice is warming up. Practicing sirens can really begin to stretch your range and gently allow the musculature in your face and neck (as well as your vocal cords) to begin to become accustomed to the sounds you’ll be making while acting.

Whether you have a high or low-pitched voice you can also begin to think about the placement of the sound you’re making. This is separate from the pitch. Placement relates to the physical location in your body where your voice is resonating. For example, if you have a head cold and are all stuffed up, you might sound very frontal, or nasal, since your sinuses are blocked and thus blocking the sound from escaping completely, therefore creating a very frontal resonant sound. If you drop the sound way back to the back of your throat, then you would almost sound like you were swallowing the sounds, creating a very different quality altogether.

Begin to play around with extremely frontal, a mid-range placement as well as a back placed sound. This is something that you can bring into your work and begin to pick and choose where certain voices you create will be placed and where others will lie instead. [Should this be a new exercise to help develop awareness of where you’re placing your voice?]

COME VISIT US ON FACEBOOK! Voice Over Voice Actor

Take Action #11 - Can You Shake Up Your Rhythms?

Our last blog exercise hopefully got you going, stepping out of your natural voice. Now, use the following exercise, which we like to call “The Phrasinator,” to shake up your own rhythms. Read each phrase on the left with the emotional intention on the right.

Exercise: The Phrasinator

  • Over here.........................................Uncomfortable
  • I need that........................................ Scared
  • Let go...............................................Frightened
  • What are you talking about..................Awe
  • Don’t do that......................................Sleepy
  • I don’t think that’s a good idea..............Happy
  • Give me the new one..........................Overjoyed
  • No....................................................Annoyed
  • Try it again........................................Uncomfortable
  • Listen to me......................................Angry
  • Alright..............................................Secretive
  • Stop right there..................................Frustrated
  • Wow that’s huge................................Excited

Was the word on the right not always the word you might have naturally associated with the phrase on the left? Did you discover some fun things simply by shaking things up a bit in this way?

Now, let’s take it one step further, and crank up the phrasinator. Try reading the first phrase with each of the thirteen words in the right-hand column, one at a time. Then move to the second phrase and do the same thing. Then the third, and so on, until you’ve gone through all the phrases and all the descriptive words. Do you begin to feel your old boundaries melting away as you expand your vocal tool box? Are you beginning to see the potential in this exercise for setting your audition apart from how another actor might automatically read a line?

If you want to continue playing with these phrases, take it one step further by adding punctuation (? . ! …) and see how that might change the way you say the lines as well.

COME VISIT US ON FACEBOOK! Voice Over Voice Actor

Take Action #8 – What Do Famous Folks Sound Like?

Choose a well-known voice to help you figure out what a particular quality sounds like, and put your quality list into practice. Think about the ways you would describe that voice to someone who couldn’t hear that person? Who are some celebrities who have unique or interesting sounds? What are the qualities of their voices that make their words or thoughts stand out? Use the following list and begin to narrow down particular qualities that a few famous folks have, as well as those of some people you come in contact with daily.

Exercise - Other People’s Qualities

Drew Barrymore

Samuel L. Jackson

Michael Jordan

Christopher Walken

Angelina Jolie

Barack Obama

George Clooney

Lucy Liu

The radio dj

A friend

A family member

______________

Take Action #6 – What can you learn from the people around you (without them even knowing…)?

One great way of getting your ear (and then your voice) attuned to a variety of voices, inflections, accents and qualities is to go people watching, or people-listening, rather... Find a fairly busy spot, like a mall, a zoo, a crowded lobby, café, etc, sit yourself down, and observe. Listen to how different people talk, take note of their pauses, inflections, their unique affectations and things you find interesting about them. Without appearing creepy, you might even pay attention to their mouths to see if there’s something specific they’re doing to create sounds.

If you think it might help, bring a note pad along so you can take notes on things you want to remember. Consider also bringing your quality check list with you so you can quantify for yourself the characteristics of the voices you’re hearing. In case you haven’t built a quality list yet, here are some examples to start with. Use them as a jumping-off point and add your own!

Calm      Pointed      Sincere      Flustered      Agitated      Loving

Hypnotic      Polite     Warm       Shrill       Distant       Brash

See how many different qualities a particular person’s voice might have: perhaps they have a calm, sincere, loving, polite voice, or maybe their voice is pointed and agitated. Mix and match to best describe the voice you are listening to, or add any qualities you become aware of that aren’t yet on your list.

Happy people listening!

Take Action #5 - Read Aloud

We stress the importance of reading out loud. It may seem simple, and maybe you haven’t done it in years, but it can be hugely effective in improving everything from your acting to your ability to quickly assess a script, make choices, and pull the words off the page. Sir Ian McKellen claims that reading out loud was how he learned to act, and I think most of us will agree that he knows his stuff in that area. So, good enough for Sir Ian, good enough for us. Here’s a simple exercise you can almost anywhere and on your own time: Pick three things to read. Any bit of written media will work. Start small if you want. A pamphlet, a matchbook, a newspaper article, a newspaper ad, a comic book, a shopping list, someone’s blog, anything. Over the course of the day, collect those three things. Now-- and this is where it gets tricky –read them. Out loud.

Read each one at least once through, and if you’ve got time and you’re enjoying yourself, read them through again. See if each time through differs for you. See how the writings may be different from each other. Is one a story? Is one just trying to sell a product? Is one using a story to try and sell a product? Is one just a list of numbers on a receipt? If you’re having fun, give a different “character” to each one, or even switch it up within the writings.

You may not feel a change after doing this exercise, but trust us, it gets your brain and mouth working in all the right ways. Most importantly, as long as you’re reading out loud there is no wrong way to do this exercise. Unless of course you’re a monk who had, until this exercise, taken a vow of silence. Or if you’re in a library where they frown on doing anything out loud.

Have fun!

Take Action #4: The Business Side of Acting

As actors we can sometimes become too focused on the craft of acting and neglect something that's equally important: the business side of acting. This may not be as "fun", but just as important as tuning your vocal instrument is finding out who might hire you to use your voice and where they are. It's a pro-active way of forwarding your career in voice-over. So for a moment look at VO as a military objective. This week's exercise focuses on selecting a few targets and doing a little recon, or research. And you won't even need to get your hands dirty. Start with what you like. For example, if you really like the show Naruto, you might search and find out that in the United States, Naruto is licensed by a company called Viz. A little more looking (with your friend Google) might turn up that the English dub for Naruto is recorded at Studiopolis. Voila! You now have a production company to add to your hit list when you have a demo to mail out! With commercials, you might have to be a little more investigative, but there are resources (such as adforum.com) out there that can help you find the ad agency who produced the commercial and who's associated with the promotion of that product.

So, for this exercise, pick an area to start with: animation, video games, or commercials. Now choose three of your favorite shows/movies, video games or commercials. Begin to do a little Internet legwork. Find out who the production company is, and in the case of commercials, the ad agency who commissioned the spot. Try and discover if the company/agency casts their projects in-house, or if they have a relationship with a separate casting company. In some cases, you may even find that the same studio/ad agency produced more than one of your selections, then you know they're definitely somebody you want to target.

There is plenty of information available on the Web, and a little digging could turn up e-mail addresses or maybe phone numbers that you could use to contact the company and find out who might be best to send your reel to. Start a file and keep the info you find for future reference. Good hunting!

Take Action #3: Breathing is Crucial in Voice-Over

Sure, breathing is important to staying alive, but because we do it all the time, we kind of take it for granted and we sometimes get lazy with it. Breathing is crucial in voice-over. You can't speak without breathing, and you can create powerful (and safer) vocal effects with proper breath control. To increase your breath control try this simple exercise. Start standing. Simply notice your breath. Now, exhale all the air in your lungs and hop/jump up into the air as you inhale as much air as you can. Then as you land begin counting aloud, "one-two-three-four..." up as high as you can on that breath. When you've emptied your lungs of air once more, jump up as you inhale as much as you can, and then land and begin counting out loud again. See if you can't get a few numbers higher than the first time, speaking as you exhale, or "on your breath."

Do this several times. Try to see if you can best your initial count by 10. Do this every day and you should begin to notice that you have better breath control and increased lung capacity. This will help sustain and protect your voice as you speak "on your breath."

** If at any point during this exercise you begin to feel dizzy, or otherwise uncomfortable, stop immediately. As with any other exercise, consult a physician before engaging in a new or unfamiliar activity.

Take Action #2: Parrot the Actors in Commercials!

(Exercises re-published with permission from VoiceOverVoiceActor.com) Flip channels on your television or radio for 5 minutes to listen to commercials. Each time you find a commercial, try parroting the voice actor who is speaking. Try to repeat not only the words, but the musicality, the nuances, the tone, and the inflections.

Then turn off the radio or TV and pick up a random piece of text (it can be an advertisement in a magazine, a book, a piece of mail, etc). Try to use the same vocal patterns, tonality and style you were just mimicking as you read this new material.

Practicing this will begin to train your ear, attune you to what is currently "hot" in the advertising world, and get you reading and speaking aloud, which is important in and of itself.